


 2. Gather your other supplies. I used nine different patterns of Heather Bailey Freshcut and Pop Garden scrapbook paper, and scraps from three coordinating Freshcut fabrics for the drawer pulls. Heavier, textured cardstock or paper works better than flimsier scrapbook paper. But both will work.
 You'll also need Mod Podge. I used matte, but you could also use the lustre finish if you prefer. I used Gorilla Glue to attach the drawer pulls, but you could use whatever adhesive you choose. I painted the chest with FolkArt craft glue by Plaid in "Baby Pink," and I sealed everything with a top coat of Delta Ceramcoat Matter Interior Varnish (it's water-based and not noxious). I got all of my supplies at Michael's (but any craft store should have them).

3. Paint the exterior of the chest (interior, too, if you want . . . I did!) and the sides of each drawer. I used three coats of craft paint, followed by one coat of Mod Podge and one coat of varnish. Be sure to let every coat dry thoroughly before applying the next. I also lightly sanded between the painting and Mod Podge stages.
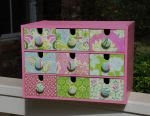
4. Using your drawer front template, trace nine drawer fronts on your paper and cut them out. Don't worry if they aren't perfect. Spread a thin coat of Mod Podge on the drawer front and lay your paper cutout on top, smoothing out any wrinkles or bubbles, as indicated by No. 1 below. The thinner paper is more susceptible to bubbling I found. Anyway, once the paper has dried, you can set the drawer, paper side down, on a self healing cutting mat and use an exacto knife to cut away any paper that overhangs. After the paper is secured to the drawer front, you can begin applying coat after coat of Mod Podge over the paper until you get the look you're after. I used six coats of Mod Podge, followed by a coat of varnish. After the first couple coats of Mod Podge, I sanded all around the edges of the drawer front to remove any last vestiges of overhanging paper and give it a slightly shabby look.

5. To make the drawer pulls (shown as No. 2 above), get nine cover button blanks and remove the little metal shanks from the back with small pliers. I used size 45 (1 1/8 in.) Dritz buttons, which you can get at JoAnn or other sewing stores, as well as online and from lots of Etsy sellers. Cover buttons with coordinating fabric. There are tons of tutorials on the internet showing how to do this, but really it's super easy (and fun and addicting but that's another story). Attach a small piece of wood to the back of the button with Gorilla Glue. I used these little cubes I found at Michael's in the unfinished wood section. Let dry completely. Attach buttons to drawer fronts with Gorilla Glue or other adhesive and let dry completely.

6. Once everything is dry, you can put the drawers in and start using your fancy new chest. This is one of those projects that end up looking like something that cost $100 at a shabby chic type store, but actually cost around $25-$30 to make. It's time consuming, but something you can work on for a bit, go do something else, and come back. I hope you enjoy this tutorial.