Showing posts with label decorating. Show all posts

Tuesday, August 3, 2010

Easy And Inexpensive Wall Art


I finally took down the the three framed Il Piccolo Principe calendar pages from my little girl's room. Since each one was in a 14 by 14 frame, I needed something pretty big for the space. Fortunately, I found this gigantic 28 by 28 frame at Goodwill for five dollars and had my husband spray paint it. I took a bunch of five by five fabric squares (cut out while watching Hidden Palms on Netflix) and sewed them together. It doesn't have to be perfect -- you can see how mine aren't lined up. I don't know how you quilter peeps do it. Anyway, I wrapped the finished squares around a piece of stuff that is similar to corkboard that my husband fished out of the garbage, but you could use foamboard or a recycled bulletin board too. I had to nail it into the frame, but it turned out pretty good, I think. After we get it hung up, I'll post a picture.

PS -- Thanks for your encouragement Lizzie. You're the best!


Tuesday, May 12, 2009

Craft Room Part One And Banner How-To


Welcome to your tour of my craft room. Since I am only able to keep one section clean at a time, each section is going to require its own blog post (i.e., week of organization). Here is the little area where I do my computer printing/copying/enlarging, etc. I have an HP 4-in-1 that works okay for most things. Next to that is my little Ikea box that holds all my stickers. Next to that are a couple of magazine files I got a few years back at Target. They hold all my printing media, like cardstock, transfer paper, full-sheet labels, etc.

Banner How-To

I made a little banner to tie everything together, and it was super easy. I used double-fold bias tape because that is what I had on hand, but you could just as easily use single-fold bias tape, twill tape or even a long piece of ribbon if that's what you have handy. I will say that the bias tape is nice and firm and makes a lovely curve that lays flat against the wall. Next, Google "isosceles triangle" and print out whatever image comes up! That's what I did, then enlarged it, cut it out, traced it onto cardboard to make a template and cut out the template. After measuring the length of the banner and determining how many triangles I would need, I traced triangles onto ten fabric scraps with a disappearing ink fabric marker and cut them out. I laid the bias tape out across the ironing board. Then I took a roll of double-sided fusible web -- the really narrow kind -- and cut a long piece of it, which I then cut lengthwise. Then I laid that on the inside of the bias tape and stuck my triangles on top of it. Then I laid the other half of the fusible web on top of the triangles and pressed the bias tape closed on top of it. This way, everything stayed in place while I ironed and sewed the banner, and it gave the bias tape some additional heft. Once everything was ironed down, I sewed the length of the banner with a zig-zag stitch. I hung it up with push-pins. It was so easy, and I love how it turned out. I'm sure I'll be making a lot more banners!

Thursday, April 23, 2009

Swatch Portraits


Here is the beginning of my "swatch portrait" wall, i.e., my favorite fabrics hanging in "frames" made of cheapy wooden embroidery hoops. I wish I could say I invented the idea, but no. I found inspiration in the craft blog world, such as here and here and here. This is an inexpensive and easy way to look at your favorite fabrics every day (which is good when you are obsessed with your fabric, like I am).

Monday, April 20, 2009

Easy DIY Lamp Makeover


Contrary to my husband's claims, I did not PURGE all of his things when we married and combined households almost six years ago. I did keep some things. Like this plain white lamp. I needed a little something for the spare bedroom, so I decided to fix up this lamp. I cut a strip of fabric about four inches wide and long enough to go all the way around the lamp with an extra inch or so of overlap. Then I made a little mark in pencil at the center of the lamp so the fabric strip would be center. I didn't sand or anything. I just slapped some Mod Podge onto the lamp and laid the fabric down on it. I smoothed as I went along to keep the fabric from gapping or having any air bubbles. Once it was dry, I used fabric glue to glue a piece of black grosgrain ribbon around the top and bottom of the fabric section. I added a new lamp shade from Target, et voila!

Wednesday, March 18, 2009

Easy Nursery Decor Ideas

Here is my "baby's" nursery circa May 2007. My friend Stephanie took this amazing picture. There are a few easy and inexpensive things I did/made to decorate the nursery that I wanted to share. Sorry for the lame photography, but I took these on a whim.


Have you noticed that lots of calendars have 12 x 12 inch pages? This is a standard frame size, so you can easily decorate the nursery with art from a calendar. Look right after Christmas when they are marked down 75% off. These pages are from an "Il Piccolo Principe" (the Italian translation of The Little Prince) calendar that my sister-in-law bought for us in Rome on her honeymoon several years ago. The Little Prince is one of my favorite books, so the instant I saw this calendar, I knew it had to become nursery art someday. So, here are the fox, the prince and the sheep in 12 x 12 frames from Michael's (don't forget your coupon), hanging right over the dresser with changing pad. I have one of the prince with the rose on the other side of the room!


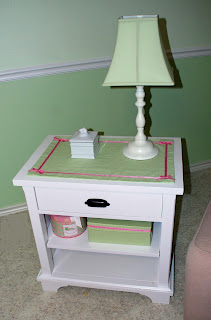
I got this little side table for next to the rocker at the Pottery Barn outlet. I got the little bunny porcelain box there, too. The lamp is from Pottery Barn Kids. I wanted to dress up the table since I knew it was mostly just decorative. I measured some cotton quilting fabric about 1.5 inches smaller than the table surface, plus seam allowance, sewed right sides together, trimmed excess, turned right-side out, pressed and slip-stitched the opening by hand. I actually glued on the grosgrain ribbon and little bows, but you could certainly put it on with fusible interfacing or Stitch Witchery or you could sew it on. The whole project cost probably $3. You can also spray it with Scotch Guard to make it easier to clean.



My child is now 35 inches tall, but I still haven't finished this little measuring stick. Oh well. It's an old board we found in the garage. Taped to get straight lines and painted with craft paint. I used Gorilla Glue to add pre-painted shapes from Michael's (get them on sale!). Or you could buy unpainted shapes and paint them any color you want. I am going to hang this about 24 inches off the ground and just mark my daughter's height right on it with pencil. This is a lot less stressful (and neater) than trying to make nice straight ruler lines all the way up the whole stick.


Last but not least, here is the latest project -- the hair clip board from the other day. I sanded an old wooden frame that was metallic gold, had my husband prime it with white spray paint and gave it about 2.5 coats of craft paint. I like the mottled look so I didn't add a third coat. I hung it up inside the closet. It's like a colorful little surprise when you open the door. By the way, if I could do it over again, I would have used a larger canvas. I didn't realize we had so many clips.



Saturday, November 29, 2008

The Cutest Room Ever


Look at this "Olivia" bedroom from Pottery Barn Kids. Do kids really live like this? This has to be the cutest bedroom I've ever seen. Adorable.

Friday, September 19, 2008

Lamp Love

I am always on the lookout for beautiful lamps. When it comes to decorating, you can make a relatively small investment for a big impact. Here are three of my current favorites. The Gourd Lamp from Source Perrier.


The Plinth Table Lamp from Williams-Sonoma Home.


The Capri Teardrop Lamp by Jonathan Adler.


Sunday, September 14, 2008

The Obsession Continues

I really don't have the motivation or resources (ahem $) to do much redecorating right now, but it doesn't stop me from obsessing over the latest fabrics from my favorite interiors firms. Here are some from Schumacher that I really love. Okay, I think we all know why I love the zig zag (well, if you don't, it's because I'm fanatical about Missoni), but the others could all find perfect spots in my home.

Wednesday, June 18, 2008

I. Am. Hyperventilating. Seriously.


Bonnee Sharp's unbelievably awesome home decor fabrics are now available for retail purchase online!!! I seriously want to buy Bonnee's entire collection of fabrics. All of it. In every color. It is that awesome. Perfect. Beyond perfect. Here are some pictures of the fabrics -- available online RETAIL, and not just to the trade. You can get any of these patterns in any of the colors she has available in her collection as well.


Studio Bon also sells delicious pillows in many of the fabrics, filled with a down-blend insert. Heavenly.


Here are some more completed projects with the Studio Bon fabrics (a/k/a what my home will look like after I win the lotto and hire Bonnee to come decorate my entire house with her fabrics & talent).