


 As mentioned, I am borderline-obsessed with covering photo albums in fabric. This little how-to represents the first time I've used regular cotton quilting fabric as opposed to home decor weight fabric. Honestly, the home decor fabric ones look nicer than this one. But the good news is that using lighter-weight fabric did not make the process any more difficult. Okay, so go get a photo album, some fabric (I used about 1/2 yard for this album, which is about 8 x 11 x 3, and had some nice scraps left over), a sponge applicator, some water and some tacky glue. If you want to decorate the album with appliques (like the "m" below) or ribbons or buttons, etc., go get those too.
The key to a really nice looking finished product is to get the right album. Check out the spine -- the ones that look like this are easy to cover over with a little tab of fabric. I find most of mine at TJ Maxx-type stores, but I've found some at Target, too.

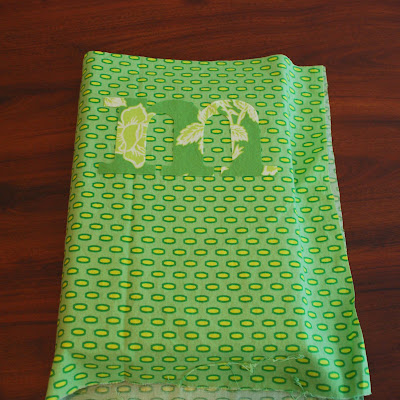
Open up your album on top of your fabric, and wrap the fabric around the album to see approximately how much you'll need. Then cut your fabric. It's kind of like figuring how much paper you will need to wrap a present.

Since I am putting a design on my album, I lined up the the fabric to get it even, then peeled the backing off the letter (see my earlier applique tutorial for more information) and stuck it to the fabric.
Next, I ironed on the applique. If you are gluing on embellishments, as opposed to sewing or embroidering, etc., you can do it after you finish covering the album. The one I posted yesterday is like that - I glued on the ribbon and fabric letter as the last step.

Next, I sewed on the applique letter. I've also made albums where I embroidered something on the fabric before covering the album with it.

Mix up your water and tacky glue. Put the glue in first, then add water until you get the right consistency -- a little bit watery so you can easily apply it with the sponge brush. You should be able to squeeze it out of the sponge brush, which you won't be able to do unless you use enough water.

Paint the back side of the album with your glue mixture, including all around the edges, and lay it on your fabric. Smooth it down with your hands to get out any bubbles under the fabric. Do the spine next, then the front.

Get some scissors, and cut a straight line from the edge of the fabric to the spine at the top and bottom edge. This is the notch of fabric you'll be tucking into the spine in the next step.

Use a letter opener, knitting needle, popsicle stick, etc., to push the tab of fabric into the spine of the book, as shown in this picture. Be sure to put just a little glue on the bottom of the spine before you tuck in the fabric, and then smooth any bumps with your fingers.


 Posts
Comments
Posts
Comments

Next, I ironed on the applique. If you are gluing on embellishments, as opposed to sewing or embroidering, etc., you can do it after you finish covering the album. The one I posted yesterday is like that - I glued on the ribbon and fabric letter as the last step.

Next, I sewed on the applique letter. I've also made albums where I embroidered something on the fabric before covering the album with it.

Mix up your water and tacky glue. Put the glue in first, then add water until you get the right consistency -- a little bit watery so you can easily apply it with the sponge brush. You should be able to squeeze it out of the sponge brush, which you won't be able to do unless you use enough water.

Paint the back side of the album with your glue mixture, including all around the edges, and lay it on your fabric. Smooth it down with your hands to get out any bubbles under the fabric. Do the spine next, then the front.

Get some scissors, and cut a straight line from the edge of the fabric to the spine at the top and bottom edge. This is the notch of fabric you'll be tucking into the spine in the next step.

Use a letter opener, knitting needle, popsicle stick, etc., to push the tab of fabric into the spine of the book, as shown in this picture. Be sure to put just a little glue on the bottom of the spine before you tuck in the fabric, and then smooth any bumps with your fingers.

Now fold the fabric onto the inside cover and glue with your tacky glue mixture. Fold in the corners as shown below, and glue the fabric at the bottom and top of the inside cover as well. Don't worry if it looks messy, because you'll be covering it up in the next step. If you end up with bulky extra fabric, you can trim that off.


Measure the "white" spaces on the insides of each cover, and cut rectangles of fabric to cover the white and slightly overlap the cover fabric. Use pinking shears for a neater look. Glue it down just like you glued on the cover, and smooth it out with your hands.


And there you have it. I hope the instructions are clear because it really is a fun and easy project. The fabric I used is from Heather Bailey's Pop Garden and Bijoux lines. Let me know if you have any questions!
Subscribe to:
Post Comments (Atom)
About Me

- Ashlee
- Wife, mother, lawyer, crafter, bargain shopper and lover of fabrics, papers, buttons, ribbons and beads.
Faux "Quilted" Christmas Stocking
Easy Learning Magnets Tutorial
Ikea Mini-Chest
Tiny Little Banner
15 Minute Ruffled Tank
Super Easy Applique Tutorial
Address Box Tutorial


8 comments:
I really love the monogram on your photo album. I think they'd make great personalized gifts. I have a book that has a project with something similar but I really appreciate the photos that help make things clearer. Great choices on the fabric too!
I'm getting ready to do this. I have a photo album I've been meaning to cover for 10 years!
Love this. But I'm not that patient. Are you going to make some to sell on Etsy? ;)
I remember doing these when i was younger, but we used to put like a padding material over the album to make them kinda puffy looking.. and we would cut a piece of cardboard out for the inside and cover the card board with material. we also would cut cardboard and cut out like a frame for the front and put lace around them, or jewels, or whatever.. we sometimes put lace around the edges of the album too.. theres so much stuff you can do with these.. thanks for the turorial tho.. cuz its been so long i forgot all the basic steps and im thinking of making them for xmas gifts this year!
My Mom used to cover our school books with oil cloth. I am going to learn how to make the fabric cover for my grandchildren's photo albums, and I really appreciate you posting the directions. I can't wait to get started! Thanks again! :)
This is a wonderful tutorial!! I have so many photo albums and I want them to look coordinated. Thank you so much :)
I'm excited to learn how to make these I hope they work as I am going to use them as gifts for christmas
I love how this tutorial breaks down each step clearly.
Post a Comment