 I apologize for the picture quality. I was making a couple of appliqued onesies for a friend and wanted to post a quick how-to, so I couldn't wait for perfect lighting.
You'll need:
Fusible interfacing of your choice -- I use double-sided fusible web
Computer/printer (or you could draw your design freehand)
Water soluble fabric marker
Fabric scrap
Computer/printer (or you could draw your design freehand)
Water soluble fabric marker
Fabric scrap
Teeshirt/onesie to which to apply your design
Here's what you do:
1. Pre-wash your teeshirt/onesie and fabric prior to beginning the project.
Here's what you do:
1. Pre-wash your teeshirt/onesie and fabric prior to beginning the project.
2. Decide on your design, and make your pattern. For a letter applique like this one, I either type a letter in Word or pull a free font off the internet, print it out and then enlarge it on the copier to the size I want. You can also draw or trace a shape to use. I like to trace cheapie wooden shapes (the unpainted plywood ones) at craft stores or chipboard pieces. If you are going to use your pattern more than once, consider printing it on cardstock or tracing it and cutting it from a light cardboard.

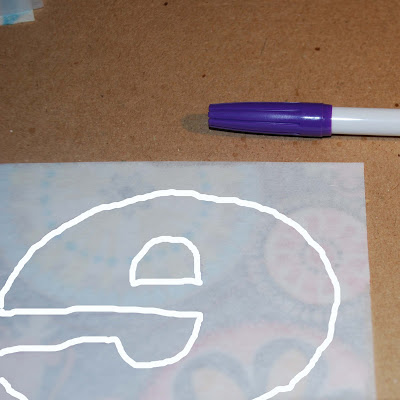
3. Cut a small scrap of fabric a little larger than your letter/shape. Cut a piece of interfacing the same size. Peel off one side of the interfacing and stick the WRONG SIDE of the fabric to it. Now lay your letter/shape pattern on the interfacing, design REVERSED, and outline it with your fabric marker. The outline I made didn't photograph well, so I show how I traced my design with the white markings.


4. Cut out your design and use your thumb to rub off any traces of marker still left on the back. Some people might apply fray guard at this point to be extra sure that the applique doesn't fray in the wash, but I don't unless it's a fancy design, like the crowns shown below. I prefer to let the design fray a little -- I like the way it looks better.

5. Peel off the other side of the interfacing. Lay your design on the onesie/teeshirt and use a ruler to make sure it is evenly space. Iron on according to the intructions on your interfacing package.

7. Let it cool, and then sew on your design. You can use a zig-zag stitch, but I prefer a very short straight stitch (1.6 mm) because it doesn't distract from the fabric or pattern. I also use matching rather than contrasting thread.

9. Iron the completed onesie/shirt. Voila! You can also sew on more than one layer, repeating the process described above (sew the first layer before ironing on the second), as shown with the butterfly below. If you don't have a sewing machine, you can skip the sewing step and just wash the item by hand. You may have to occasionally re-iron the design on though. Or you can sew it on by hand using embroidery thread (I use four strands), like the Freshcut heart in the second picture. Have fun, and let me know if you have any questions.


14 comments:
Cute! My fav tee is still the iron on heart you made for Ava - she's just now out grown it. And it makes me super sad. . . .
So cute! I love all of your fabric choices. I've bookmarked this for when my next friend has a baby. Thanks! :-)
I'm the friend! I'm so excited to give them as gifts. Thanks!!
You are so creative!! Thanks for the tutorial!
Thank you! You are so amazing!
I love you. You are the person who started my love for applique after the shapetangle and Mak's 1st bday shirt!!! I've done WAY too many of these for friends' babies!! ...and wait till you see what Zoe and Mak wear home from the hospital :)
you rock
I finally was able to use this tutorial for a friend's baby! Here are my results: http://gluegunannie.com/?p=435
Thanks for the great tutorial!!
These are adorable! Thanks for sharing your "trade secrets."
too cute! i have a quick question when you straight stich then later wash does the fabric frey?
Great tutorial, I'm featuring it on my blog, thanks! http://onmysideoftheroom.blogspot.com/
Thank you so much for this tutorial... I just made a couple of these to add to the baby bibs and burp cloths I am making for a couple of expectant moms. These will make a great personalized gift that I am sure they will love.Thanks again :)
Absolutely adorable!!!
Liz
Loving This Mom Stuff
Amazing tutorial
Post a Comment